This interactive “Full Loop” session will provide best practices on using ticket statuses and types. When your agents use these features correctly, you can optimize workflows and scale your support operations more easily. You will learn how to:
- Use ticket statuses
- Organize your workflows according to the current status
- Automatically manage pending tickets
Part 1: Understand When to Use Each Status
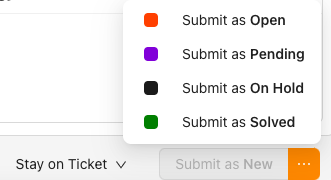
There are five values for the ticket status, and in this article, you can find a definition for each of them. It’s important to understand the purpose of each status, as they help strengthen both your workflows and reporting across the account. That said, here are a few specific points to keep in mind.
Open and Pending: These statuses are fundamentally opposite. Open means the ticket should be handled by a representative in your company, while Pending means that more information is needed from the requester to resolve the issue.
It is essential that your agents use the pending status correctly to avoid delays in resolution time. Let’s look at a simple example to understand why:
Most ticket views prioritize New and/or Open tickets, as these require action from an agent. If a ticket is transferred from one agent to another and is accidentally set to Pending, it will not appear in the new assignee’s New or Open views. It may go unnoticed until the customer wonders what caused the delay.
Therefore, when an agent is responsible for the next step, always set the status to Open.
Pending is used to track tickets that require input or resolution from a third party. It should not be used as a substitute for Open or Pending statuses.
Resolved and Closed: These two statuses represent different stages at the end of a ticket’s lifecycle.
Agents can mark support tickets as Resolved when they believe the issue is solved and no further action is expected from the requester. If the requester replies, the ticket is reopened.
Closed is a permanent status, enforced by business rules or system automation. In this state, the ticket cannot be reopened or edited. Any reply from the requester will create a new follow-up ticket.
Your Grispi account includes a default automation that automatically closes tickets 30 days after they are marked as Resolved.
Part 2: Leverage Pending to Automate Your Ticket Workflow
It’s best practice for agents to set a ticket to Pending status while waiting for a response from the end user. This keeps their view uncluttered and helps them focus on tickets that are ready for action.
Although reviewing pending tickets and sending regular, friendly reminders is a good practice, this takes time that could be spent handling new queries.
Part 3: Use Pending Status to Track Third-Party Tickets
The benefits of using Pending status for third-party collaborations include:
- Filtering third-party tickets while monitoring agent performance
- Creating filters to track tickets that require external input
- Automating emails to third parties requesting updates
- Analyzing time spent in Pending to identify inefficiencies
All of this helps you gain better visibility into your support operations and track who is responsible for what.

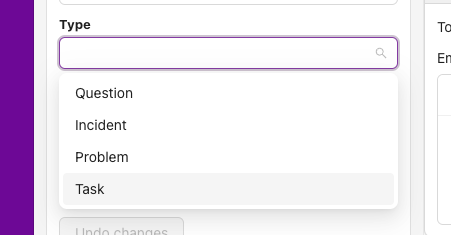
Part 4: How to use ticket types
Using ticket types correctly equips your agents to handle different scenarios more efficiently. It also enables faster decisions based on more accurate data.
- Question: Most tickes fall into this category. These are straightforward customer questions that require a response.
- Task: This type allows you to set a deadline and can be used in automations for reminders or follow-ups.
- Problem: Broad issues affecting your product or service that impact multiple users.
- Incident: Specific occurrences of a larger problem affecting individual users.
Part 5: Working with problem and incident tickets
When problem and incident tickets are used together, they make life easier when large-scale problems arise. Understanding the full value of these related types of tickets is easiest when considering an example:
Suppose your company makes games for mobile devices. You may get multiple reports from customers saying that the app closes when they try to upload a new avatar to their profile. Instead of managing these tickets separately in a time-consuming and potentially confusing way, each one can be recorded as an incident connected to the larger problem affecting those customers.
In doing so, you can easily see that this “Avatar Loading Problem” has been reported by X customers. Once your team has updates to share and the issue is resolved, all they need to do is update the ticket and their comments will cascade down to all relevant incidents and customers (saving your agents a lot of time).
When it comes time to analyze, it will be easy to compare your handling time and CSAT scores on the different problems your team manages. Also, if you are managing multiple issues that will take some time to resolve, your team can prioritize based on those with the highest number of incidents.
Another way to use problem/incident tickets is a proactive way. Using the same company example, let’s assume you have scheduled maintenance for your application. You can create a problem ticket in advance for your agents to apply at that moment.
If you encounter a problem/incident scenario, use these simple steps:
1. Create your own ticket to solve the problem.
2. When you update or reply to the problematic ticket and mark the status as resolved, it will automatically flow to the related incident tickets (saving you a lot of time!)
Making it “full circle”
“A small push in the right direction can make a big difference,” said Sandip Karmakar.
We hope these small changes to your use of ticket status and type will make your agents fit for a truly scaling workflow.